I called this "The Idiot's Guide" because it really is a step by step even showing the obvious, but before I did the install I wondered exactly what was involved...not to mention I lost a few minutes here and there searched for mounting point and such.
Minimal tools are required to perform this installation and just about anyone should be able to do this installation.
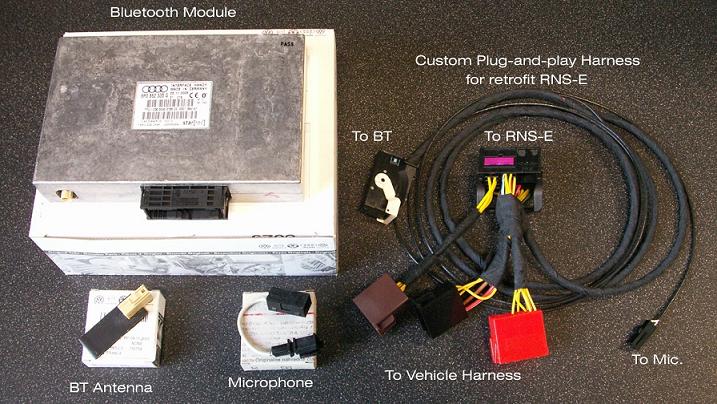
The kit I used came from NSX JR here on the boards and was very complete and direct plug-and-play.
The items in the kit are shown here... (NSX JR I hope you don't mind me using your picture )
)
![Image]()
First few steps are basic and no pictures are provided.
- Begin by disconnecting the battery using a 10mm wrench.
- Remove RNS-E from dash using radio removal keys.
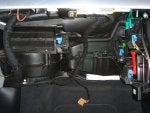
- Plug all components in to verify that everything powers up and functions prior to tearing the glovebox out, this way if something is wrong...you won't do a bunch of work for nothing.
![Image]()
- Power on everything (turn key to igition on) and make sure everything looks ok.
![Image]()
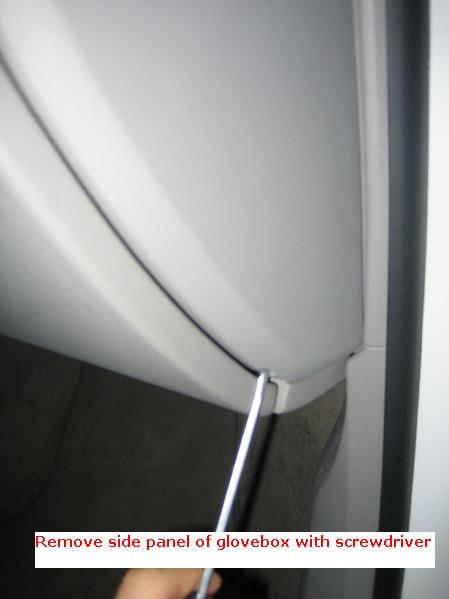
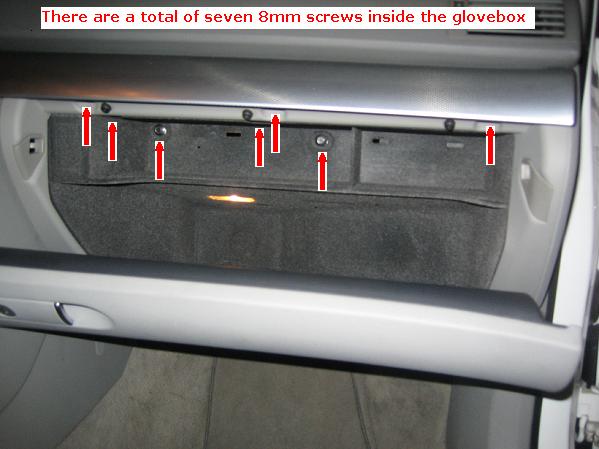
- If everything is good, it's time to start tearing apart the dash.
![Image]()
![Image]()
![Image]()
- Pull down on the glovebox and it will snap out of place fairly easily.
Once removed, you can see where the BT module will sit...
![Image]()
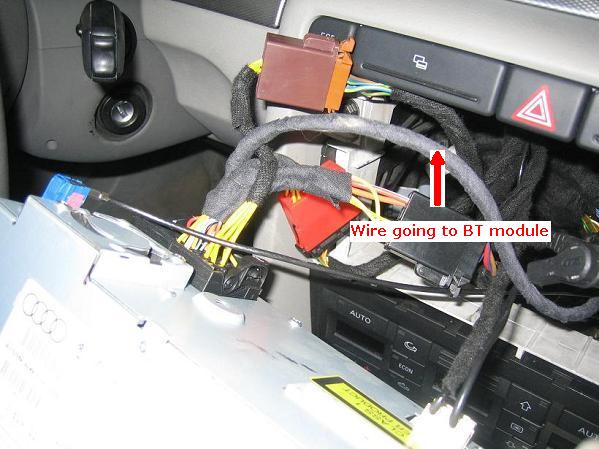
- Start to feed the wires through and plug the harness into the BT module...
![Image]()
![Image]()
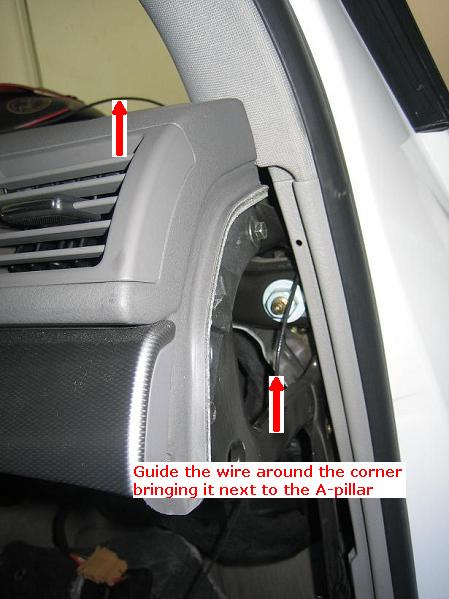
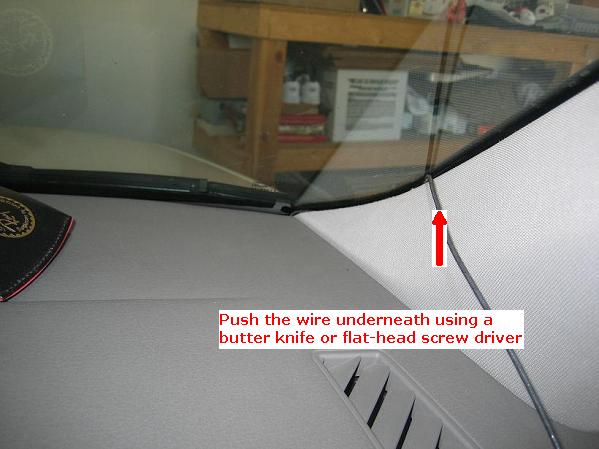
- Continue on with the microphone wire which will end up at the map light/sunroof control...
![Image]()
![Image]()
![Image]()
![Image]()
![Image]()
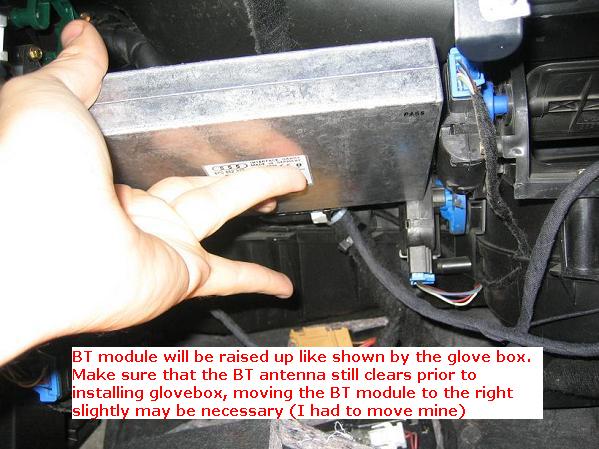
- Although the BT module sat very nicely in the above picture, once you install the glovebox it will actually push up on the module using the zip tie as a pivot point. *Make sure* that the BT antenna has enough clearance by lifting on the BT module yourself and feeling around.
![Image]()
Your install is pretty much complete at this point as far as the BT module is concerned. Reinstall the glovebox and move back to the microphone install.
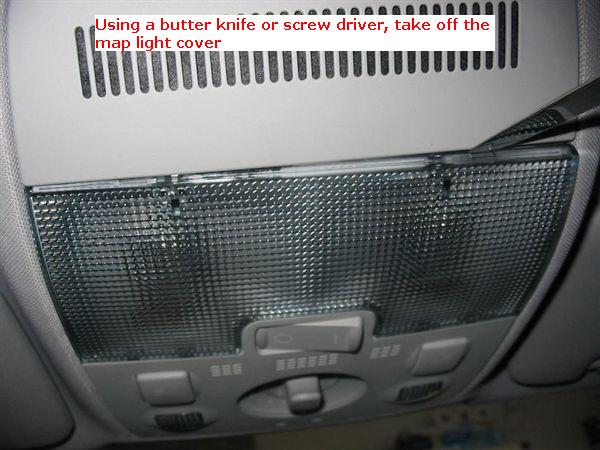
The map light needs to be removed next...
![Image]()
![Image]()
![Image]()
![Image]()
- Once the microphone wire lead is fed through, install the BT microphone...
![Image]()
- Re-install all components and you're done with the hardware install! It's that easy!
The next step of the installation is to program everything via VAG-COM.
You will need VAG-COM version 512.4 to do this. Directions on how to program everything can be found on NSX JR's site here:
http://www.nsxjr.com/docs/RNS.pdf
The Bluetooth VAG-COM instructions begind on page 40 of the PDF file (which is actually numbered page 37).
*Note that the VAG-COM program must be shut off after you make changes for them to take effect...I even removed the VAG-COM cable to make sure*
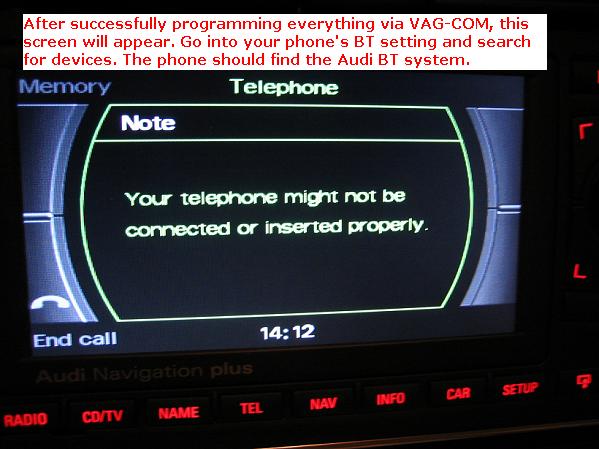
Once VAG-COM is complete, you are completely done! Here is what you should see with the system working properly.
![Image]()
![Image]()
![Image]()
I hope this is of some help to anyone looking to install the plug-and-play BT kit.
Minimal tools are required to perform this installation and just about anyone should be able to do this installation.
The kit I used came from NSX JR here on the boards and was very complete and direct plug-and-play.
The items in the kit are shown here... (NSX JR I hope you don't mind me using your picture
)
First few steps are basic and no pictures are provided.
- Begin by disconnecting the battery using a 10mm wrench.
- Remove RNS-E from dash using radio removal keys.
- Plug all components in to verify that everything powers up and functions prior to tearing the glovebox out, this way if something is wrong...you won't do a bunch of work for nothing.

- Power on everything (turn key to igition on) and make sure everything looks ok.

- If everything is good, it's time to start tearing apart the dash.

- Pull down on the glovebox and it will snap out of place fairly easily.
Once removed, you can see where the BT module will sit...

- Start to feed the wires through and plug the harness into the BT module...

- Continue on with the microphone wire which will end up at the map light/sunroof control...


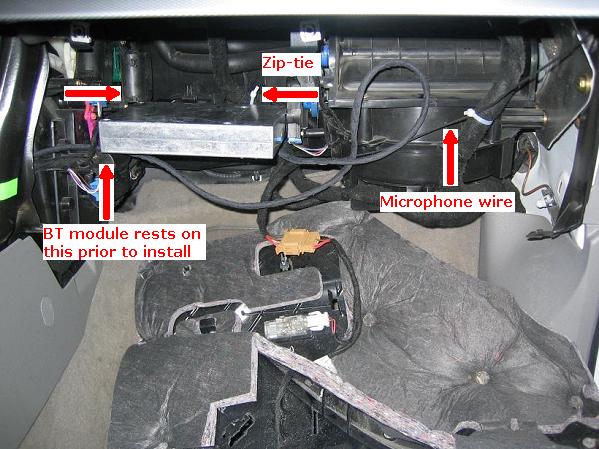
- Although the BT module sat very nicely in the above picture, once you install the glovebox it will actually push up on the module using the zip tie as a pivot point. *Make sure* that the BT antenna has enough clearance by lifting on the BT module yourself and feeling around.
Your install is pretty much complete at this point as far as the BT module is concerned. Reinstall the glovebox and move back to the microphone install.
The map light needs to be removed next...


- Once the microphone wire lead is fed through, install the BT microphone...

- Re-install all components and you're done with the hardware install! It's that easy!
The next step of the installation is to program everything via VAG-COM.
You will need VAG-COM version 512.4 to do this. Directions on how to program everything can be found on NSX JR's site here:
http://www.nsxjr.com/docs/RNS.pdf
The Bluetooth VAG-COM instructions begind on page 40 of the PDF file (which is actually numbered page 37).
*Note that the VAG-COM program must be shut off after you make changes for them to take effect...I even removed the VAG-COM cable to make sure*
Once VAG-COM is complete, you are completely done! Here is what you should see with the system working properly.

I hope this is of some help to anyone looking to install the plug-and-play BT kit.